The Laundry Room Reveal|After The Before

Hi Friends,

Happy August!  A teacher friend of mine compared the summer months to a weekend in the following way: June is Friday, July is Saturday and August is Sunday.   Anyway you look at it, summer is flying by and we have arrived at the “sunday of the summer.”

Today I have another “after” to share with you,  but before I do I’m taking you waaaaaay back to the beginning.  Remember the series of blog posts entitled “Before The After” where I showed you what our abode looked like when we bought it?  Well, in Before the After: Part 4, I introduced you to our scary basement.  I mean…would you want to walk down these stairs?  SuperHouls tried to tell me it wasn’t so bad.  Ha!  I’m the one who does the laundry, so easy for him to say!

ooooooo...a scary basement

Basement Stairs Before

And here’s that same view today…

Basement Stairs After

Not so scary stairs, after.

These stairs lead to the Man Cave and the laundry room.  Now, let me jog your memory on how the laundry room space started and be sure to click on the pics for a larger view ’cause I really want you to get the whole experience of the space before we tackled it:

What a messy, raw, unfinished space…with water issues everywhere.  Think old-school cellar.  Again I ask,  “Wait, why did we buy this house?” ” Oh, right, we had no idea what we were getting into!”  How far we’ve been dragged come.

Thankfully, two years into this fixer-upper, I got SuperHouls on board with finishing this space because he really needed his own place for his office and music…wink, wink.   And, of course, we needed to add a bathroom while we’re at it because…that’s a no-brainer.   So we hired out to a carpenter, plumber and electrician to finish the scary basement. It. Was. Quite. The. Project.  It took a few months and unexpectedly included adding a french drain and sump-pump on the perimeter of the house. Yeah, we were lucky enough to buy on the side of the street that is on a downward slope.  And while we’re at it, why not add a patio out back and rear entrance.  See how that happens?

But back to the laundry room.  After moving the heating pipes, updating the electrical, adding plumbing, framing and sheet rocking the walls, and adding new windows, SuperHouls and I painted.   Then he installed laminate wood flooring in the  Man Cave and tile in the bathroom/laundry room.  I’m exhausted just thinking about it.  Can I get an Amen, sista!

A few months later, it was clean…and functional…and beautiful compared to how it started. BUT.  I knew it needed some additional storage solutions before we could officially call it finished.  I mean, do we really need two windows in a small space?  Um, no.  I needed storage cabinets!  SuperHouls was ready to tackle it this summer – while I was away – and began working on covering up a window to add storage on the back wall.  Sorry for the dark iPhone photos:

We are now calling this room done!  We’ve got storage, we’ve got a hanging area, we’ve got open shelving, and of course plenty of room for decorative touches.  Ready?  Come on in…

Looking in from hallway.

Looking in from hallway.

Notice the mirror on the right in the hallway from my mirror makeover post?  How about the toilet bowl right in front of you?  If I had to do it again, I’d lay it out differently, but hindsight is 20/20, right?  Remember this is a bathroom/laundry room two-fer…’cause why not?  It’s also the bathroom off the patio that we send friends and family to when entertaining.  OK, lets take a closer look at what SuperHouls accomplished…

Laundry Room Organization

Laundry Room Organization

In the above photo, the sink and the shower stall come into view, giving you a better idea of the space. The cabinet is where the window was.  I wanted open shelving on its left and a hanging rod on the right.  What I really wanted was a cabinet on each side and the hanging rod in the center,  but we had to keep the right side accessible for the vent pipe.  So, this is essentially a workaround design.   I’m quite happy with how it all turned out: beauty meets function.  Down the road…wait, did I say that?…I might want to add a shelf across the top of the machines, but for now…its all good…and laundry day is much more pleasant here at the abode.

Laundry Room Shelving

Laundry Room Back Wall

Laundry Room - Open Shelving

Laundry Room – Open Shelving

Laundry Rom - Hanging Rod

Laundry Rom – Hanging Rod

We did keep the window above the toilet.  I hung a cafe curtain and kept the upper part of the window uncovered so the light can still shine through.  Having it recessed and boxed in provides me with another shelf to accessorize.  If you accessorize these spaces they are less likely to become catchall places…which, don’t even get me started!

And one last before and after…

What a transformation!  Right?

Hey, if you enjoyed this post, leave a comment below and then share it with a friend.

#sharingiscaring

Be well,

Eileen

Romeo & Floyd - The Inspectors

Romeo & Floyd – The Inspectors

The Mancave Makeover Update – Featuring SuperHouls, Billy and Pink Floyd

Hi Friends,

The Mancave is complete with new paint, new built-ins and newly styled shelves that include organization solutions. I introduced this project in this post about the Mancave, and like all projects, it took on a life of its own.  I’m excited to share the results.  #superhoulsrockedit Continue reading

Every Woman Deserves A Walk-In Closet…Boutique Style

IMG_0441

Hi there,

Done!  Another check on the to-do list.  And…I’m pretty excited to reveal the fabulousness of my walk-in closet makeover.  But first, here’s the back story…

Our spare bedroom is small teeny-tiny small.  If I were in the market for a baby crib, I could turn it into a beautifully sweet nursury…BUT…those days are over.  So the only options left, as far as I can see, is an office or a walk-in closet.  I’m a female.  I have more clothes, shoes, purses and accessories than I need.  Apparently, the women who were around when my home was built in the 1920s, were females of a different sort.  The sort who didn’t think they needed closet space.  I’m not sure where they put their “stuff”, but I found a solution to the dilemna they left us.  Ladies, if you are one of the lucky creatures whose house came with a fabulous, spacious walk-in closet to-die-for, this post is probably not going to rock your world.  For the rest of us who aren’t as lucky, I suggest you take that spare bedroom that no one ever sleeps in and turn it into your Lady Cave.  That’s what I did.  Let’s start a new trend.

Here’s what I started with…a sorta, kinda functioning walk-in…

IMG_0385

Right Side

IMG_0386

Left Side

IMG_0387

Full Length Mirror…Not

The before pics clearly show the space was not being utilized as well as it could be.  We put it together quickly since we had so many projects that needed our attention when we first bought the house. Over the years, it became more disorganized and I couldn’t see what I had…mornings became increasingly stressful…etc., etc.  In my mind I had a vision of a beautiful boutique styled dressing room walk-in closet and it included Super Houls’ skillset.  Once summer arrived and things slowed down a little, he got on board…suprisingly easily…love when that happens!

So we cleared out the room, gave it a fresh coat of paint, and Super Houls got out the toolbox…

It always gets messy before it gets beter.

It always gets messy before it gets beter.

IMG_0402

Make sure everything’s level.

IMG_0405

Old houses with plaster walls need stud finders to make sure what goes up, stays up.

IMG_0403

Once the studs are located, the vision starts to come to life.

Are you ready for this ladies?  Grab a coffee, glass of wine, whatever you need.  OK, come on in…

IMG_0421

IMG_0415

Marilyn Monroe and Audrey Hepburn:  Icons of Femininity!

As you can see from the reflection in the mirror, my prints of Marilyn and Audrey were hung before we finished cleaning up.  I can’t help it, I get excited.  I got these prints from vintage Life Magazines that I found at an estate sale.  I simply cut them out and framed them.  Beautiful, inexpensive art…BAM!  Here’s some close-ups…

IMG_0436 IMG_0438

Next, the shelving went up.  I got the shelves for free from a friend who was throwing them out. They were dusty with a dark wood stain.  We sanded them and painted them white with our new paint sprayer.  Super Houls used simple shelf brackets to secure them to the right wall…

IMG_0442

Shelving Display

Below is a dresser I bought a few ywars ago.  Now my make-up organizer and jewelry are at hand.

IMG_0456 IMG_0460

On the left side, we added the organizing system for my hanging clothes.  But first I got rid of all of these…

photo

No more plastic, slippery hangers…

IMG_0446 IMG_0448On the back wall to the right of the window, more shelving and an organizer for my belts…

Back Wall

and a close-up…

Back Wall Shelving

Back Wall Shelving & Belt Organizer

And to top it all off…literally…the chandy got a good cleaning…

IMG_0451

Ladies, there you have it…a Lady Cave that is glamorous and feminine and pretty with a hint of sexy.  What do you think?  Here’s one last look…

IMG_0442

IMG_0438IMG_0440 IMG_0417

Hey, if you enjoyed reading this…why not follow me?

Be well,

Eileen

PS…I’ll be busy for the next few weeks working on a non-blogging project (yes, unfortunately they exist for me) and then I’m heading to the beach for a few weeks.  I’ll be back at the end of August.

Enjoy your summer!!

I’m linking to The Sunday Showcase.

Sorting Through the Mail

Hi Everyone,

This week I’m sharing my first ever DIY project.  This project was from my pre-blogging days and was inspired by this post from sisters Ashley and Whitney at Shanty2Chic (www.shanty-2-chic.com)…

Shanty2Chic

Shanty2Chic


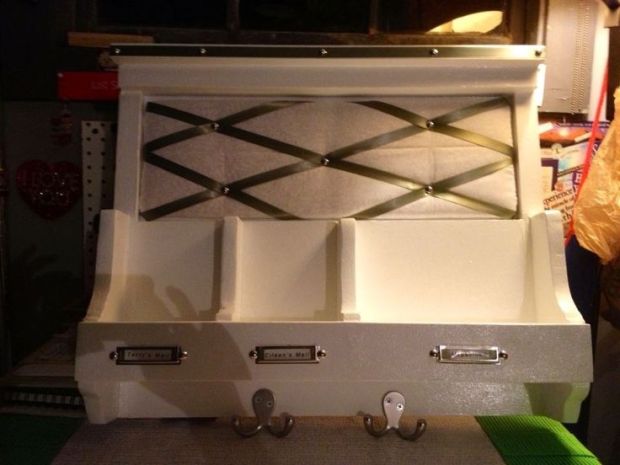
Super Houls gave our small mudroom a makeover a while back (a future post, I promise) and I wanted to contribute to the desperately needed organization.  So I created my own version of a mail sorter.  Sorry that I do not have any process pics, but like I said, this was from my pre-blogging days.  I love the chalkboard on the inspiration photo but we needed a place to put up small notices, giftcards, discount coupons, etc., etc., etc.  That’s the beauty of DIY, you can customize anything for your needs.

I decided my version needed a space for a french bulletin board rather than a chalkboard and I customized the mail slots to include one for magazines…

Assembled Mail Sorter

Assembled Mail Sorter


Once I cut, sanded and assembled all the pieces,  I primed and painted and then glammed it up a bit with some fabric, ribbon, tacks, labels and key hooks…

All dressed up!

All dressed up!

I was taking pics with my iphone but you get the idea.  Here’s one last look…

mailsort3

We hung this piece on the wall in the mudroom and it is working beautifully to keep our mail organized.  And when I share the mudroom makeover, you’ll see it in action.

I think Spring has finally arrived!

I love my cat run!

I love my cat run!


Thanks for stopping by and hey, if you enjoyed reading this, why not follow me?

Peace,

Eileen


Crafty Organization

Hi there,

I’m a little late on this week’s post.  I work full-time and blogging is new to me so my goal is one post a week.  Since I’ve started I’ve been able to meet this goal but I didn’t realize how much time one post takes.  There’s the planning, the doing, the photo taking and the writing and editing.  Once summer arrives, I’ll have more time to dedicate to it…can’t wait cause I love it!

It’s January and I am on an organization tear.  Now that all the holiday decorations are put away and the attic is organized (thanks Super Houls!), I’m finding many areas that have been um, neglected.  This week, my focus was on finding a home for my craft supplies.  My vision is to have a place in the attic once we finish it in the near future.  For now I carved out a little space in our TV armoire that I found on Craigslist this summer for two hundred dollars.  It’s an Ethan Allen piece (in perfect condition) so it was definitely a steal.

OLYMPUS DIGITAL CAMERA

The TV is housed in the center and there’s shelving behind the door on the left.  It started to collect random items that are easy to tuck away behind the closed door – perfect for my craft supplies.   I’ve also been drawn to the color blue lately.  Not sure why, but it’s not a color I decorate with and doesn’t go with the colors in my home so I thought this is a perfect place to satisfy my sudden need for blue.  Here’s what I found at the dollar store for two dollars each (I bought five)…

OLYMPUS DIGITAL CAMERA

OLYMPUS DIGITAL CAMERA

I love the color and the jewelry…label holders, corner pieces and pulls for two dollars!  So I went through my label collection and found these…

OLYMPUS DIGITAL CAMERA

They were the perfect width (love when that happens!) so I just cut them and then used my label maker to add the labels…

OLYMPUS DIGITAL CAMERA

Because the armoire is solid wood, I needed to brighten up the inside.  I lined the shelves with supplies I had lying around.  Here’s a before and after lining…

OLYMPUS DIGITAL CAMERA   OLYMPUS DIGITAL CAMERA

Subtle, but I think it makes a big difference.  Maybe Super Houls will add some lighting down the road.  Wouldn’t that be nice?  Here’s a few more photos…

OLYMPUS DIGITAL CAMERA 

OLYMPUS DIGITAL CAMERA

I love organization projects, especially when they cost so little.  They make life so much easier, don’t you think?  Now I can find all my supplies in one area…at least until I outgrow this space.  Every time I open the door, I do the happy dance.  This perplexes Super Houls.

Hey, if you enjoyed reading this, why not follow me?

Thanks for stopping by,

Eileen